
Matches the functionality up to and beyond the former “HP Virtual Table server.“ The ADR tool provides shared data tables that can be accessed by multiple scripts during the execution to manage data (C.R.U.D. operations). ADR will help accomplish the data sharing across the scripts during the execution, eliminating the need to attach data to the script before the execution to manage data.
ADR can be used in any use case where the script execution requires dynamic data, like feeding script with credentials, feeding script with security tokens, sharing data across different microservices scripts in the same application, etc. So basically, customers can save time by using the ADR tool, so it is apt for cost savings and flexibility.
To communicate with ADR for data retrieval and feeding, ZebraTester now includes new inline functions.
The pros over the “HP Virtual Table Server.”
Ease of use (Has a Rich GUI)
Security (both in the GUI and API)
Low Resource consumption
Rich APIs support
Scalability
Better performance
Release Notes Pages
https://files.apicasystem.com/ApicaDataRepository/1.4/ApicaTableServer.pdf
V1.4 Release Notes (Dec 02, 2021)
Releasing as a standalone package (before it was delivered along with ZebraTester)
Tables are saved as encrypted files, means not as plain CSV files
Supports Search option by a keyword on the created tables
V1.3 Release Notes (April 22, 2021)
Support for
client certificate authentication when communicating to ATS API end points. (refer section 1.2 for more details)
Supports new API end point for query table based on column names and values like below example GET url - http://127.0.0.1:8992?cmd=ats_retrieve_row_by_column body JSON- { "TableName”: "table_name", "MatchColumnNames": ["column_name1",”column_name2”], "MatchColumnValues" : ["column_value1","column_value2"] } This API should also support retrieval based on multiple column names and values. This API also supports an optional input OutputColumnNames, the column names in a row to be retrieved based on the matching column names and values.
Supports the user case of not removing the retrieved column value from the table when querying based on the row index.
V1.2 Release Notes (January 17, 2021)
Support for
Authentication using a username and password, Authorization with the help of Users - Groups - Tables relations.
Create a New Table option, so that the user can create new tables that will be automatically added to the groups, the user belongs to.
Fixed bugs related to intermittent issues - duplicate retrieval and insertion of data.
V1.1 Release Notes (September 30, 2020)
Support for
Column actions like insert value at the start, append a value to the end, insert a column, and delete a column.
Row actions like editing a row; modifying the values of the columns inside a row or delete a row.
Server-side pagination for the ATS tables, so that table with a huge amount of data will load in milliseconds.
Enable /Disable API Access
If disabled, the APIs supported by ATS won’t be reachable.
Added a new API call for getting the size of a table on ATS.
V1.0 Release Notes (July 20, 2020)
Import CSV files
Contents of the CSV files will be stored as a table and can be viewed in the ATS GUI.
Support Multiple tables
There’s an available drop-down for selecting a particular table.
Export the selected table.
Delete the selected table.
REST endpoints can Retrieve and Upload data from/to ATS.
Installation of ADR
Installation (Click on the OS specific icons to download the package)
ADR latest production version is released with log4j fix for CVE-2021-44228, CVE-2021-45046 and CVE-2021-45105
In case you had a previous ADR (ATS) installation along with ZebraTester, then you can install ADR in a separate directory and then copy the ATSDataSet folder from the previous ZebraTester installation folder to the new ADR installation folder, so that all configurations & tables will be copied.
OS | Instructions |
|---|---|
Windows | In Windows after the installation of the ADR kit, if you want to install ADR as a service, there are 2 .bat files available to install or uninstall ADR.
After running the installation script, you can see a service running with the name ADRService. Start a web browser and enter http://127.0.0.1:8990/. |
MacLinux | After the installation of ADR kit, please run the ADR.command from the installation folder to start the ADR process Start a web browser and enter http://127.0.0.1:8990/. After the installation of ADR kit, please run the ./ADR from the installation folder to start the ADR process Start a web browser and enter http://127.0.0.1:8990/. For manual Installation on Linux Note that an Adopt Open JDK 11 must already be pre-installed. 1. Manually create the installation directory /usr/local/ADR (you may also choose any other installation directory) 2. Copy the files ADR.jar, iaik_jce_full.jar, iaik_ssl.jar, iaik_eccelerate.jar, iaik_eccelerate_ssl.jar to this directory (you can copy these files from a Windows or a Mac OS X installation of ADR. These files can be used for all operating systems). 3. Set the Java CLASSPATH environment variable to include the installation directory, the default directory ("."), and the path to all *.jar files. Example: 4. Start ADR with the following command: java –Xmx4096m -Dfile.encoding=UTF8 5. Start a web browser and enter http://127.0.0.1:8990/. |
After installation , the next step is to create a super user ,so that that user can login and create groups and users.
Run CreateSuperAdmin.bat or CreateSuperAdmin.sh or CreateSuperAdmin.command file from the ADR installation directory
Create a super user by calling the menu option 7 (add account)
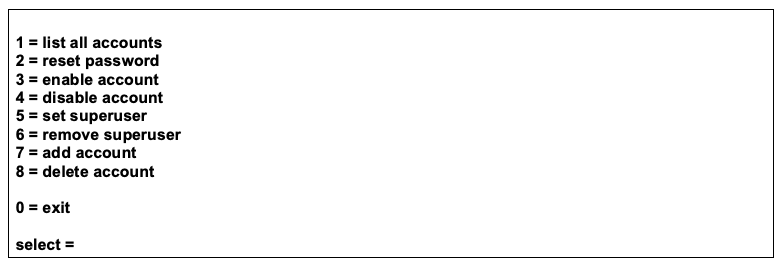
3. Enter now 7 and create a new super user account. Then exit this utility.
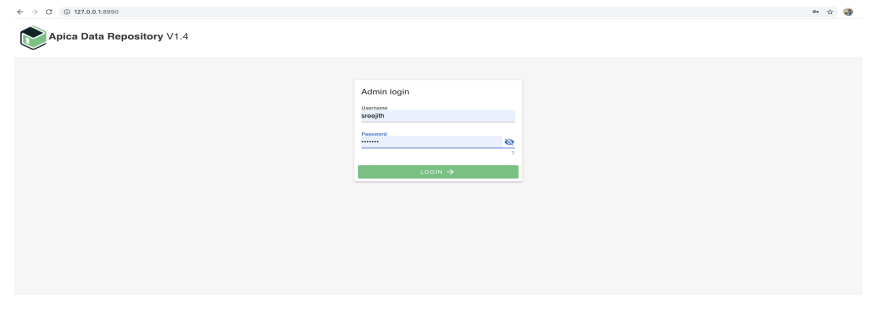
The next step will be login as the created super user and create groups and users like the below screenshots
After the successful login, you can manage users, groups, users - groups relations like the below screenshots

After a creating a group and user belong to that group , the created user can login to ADR by providing the username and the default password “password”. User can change the password by the help of the change password screen after logged in.
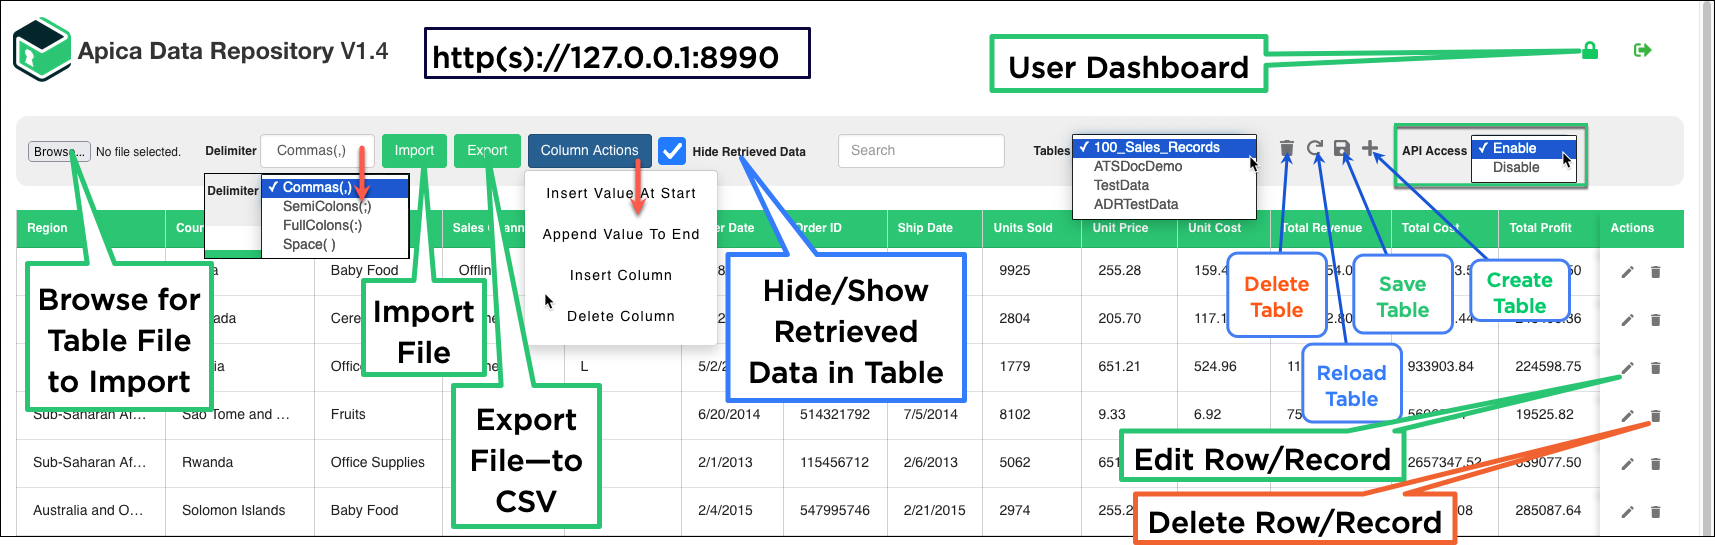
Once the normal user is logged In , then that user can upload tables in the form of .csv files. Below is the GUI for that:
How to configure ADR from within ZebraTester in order to enable inline script functions
If you would like to utilize functions such as getTableColumn, setTableRow, etc. in order to get data from or make changes to your ADR tables, you must first enable your ZebraTester instance to communicate with the existing ADR server. You can do this by configuring the “Apica Table Server API Configuration” within your ZebraTester Personal Settings.
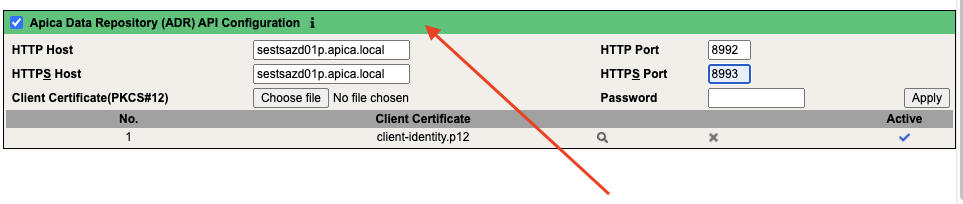
Plain TCP connections are allowed between ZT and ADR (see screenshot 1 below). However, Apica always recommends securing communication between ZT and ADR via TLS using mTLS authentication (see screenshot 2 below).
In order to set up ATS to communicate over HTTP, you should only enter details in the “HTTP Host” and “HTTP Port” boxes:

If you attempt to enter details into the “HTTPS Host” and “HTTPS Port” boxes but do not upload a corresponding .p12 certificate to secure the HTTP connection, the connection will not work! As such, if you would like to configure ZebraTester to communicate with ADR via HTTPS, you must upload a client certificate as well as filling in the HTTPS details:
Accessing the ADR with Inline Scripts
getTableColumn(tableName, columnName) | Retrieves the first row in that column, there is an optional parameter row index you can pass as well when you need to have value from a particular row index country = getTableColumn("100_Sales_Records", "Country", 1) By default this function will give different column values for each request , but if you want to get always the same value , you need to pass the third parameter row index team = getTableColumn("TeamDetails", "teamName", 2) |
getTableRow(tableName, columnNames) | Retrieves the first row of each column given. columnNames separated by semicolon . Next call will give the second row and so on. getTableRow("100_Sales_Records", "Country;Region") |
getTableRowByColumn(tableName, matchColumnNames, matchColumnValues, outputColumnNames) | Retrieves the first row of column values that matches given column names and values. User can also supply the output columns to be retrieved , but it is optional . In case of multiple input, the values of matchColumnNames, matchColumnValues and outputColumnNames should be separated by a semicolon This function will always give the values of the columns consistently, means you can have the same set of values for every call based on the criteria getTableRowByColumn(“100_Sales_Records”, “Region;Country”, “Europe;Russia”) |
setTableColumn(tableName, columnName, columnValue, uniqueFlag) | Set a value to a single column of the table. Value of uniqueFlag can be 0 or 1 setTableColumn("100_Sales_Records", "Country","USA", "0") |
setTableRow(tableName, columnNames, columnValues, type) | Set the values of a row in a table(columnNames and columnValues separated by semicolon). Value of type can be ROW or UNIQUE or STACKED setTableRow("100_Sales_Records", "Country;Region", "Japan;Nagasaki", "ROW") |
updateTableColumn(tableName, columnName, columnValue, uniqueFlag, rowIndex) | Update a value to a single column of the table by row index. Value of uniqueFlag can be 0 or 1 updateTableColumn("100_Sales_Records", "Country","India", "0", "1") |
ADR REST Endpoints
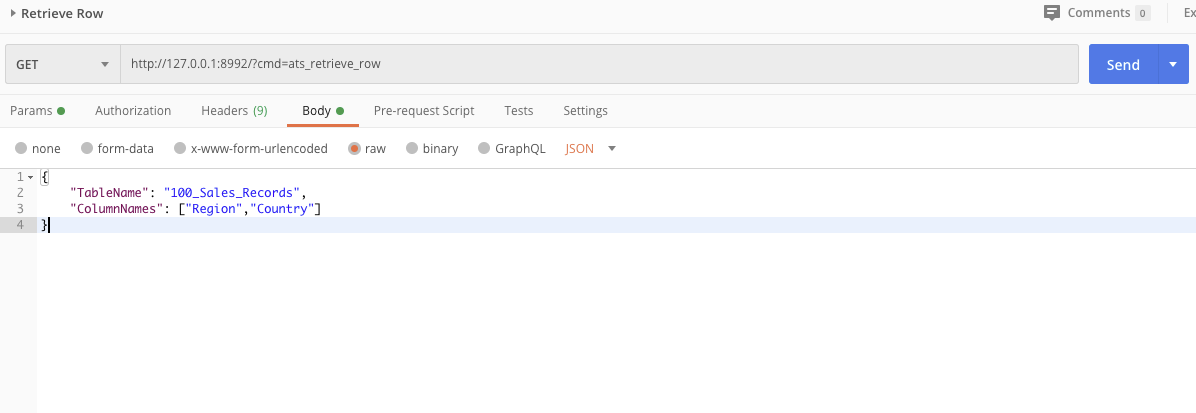
1. Retrieve column values from a table
GET url - http://127.0.0.1:8992?cmd=ats_retrieve_row - Suits performance testing use cases
body JSON- {
"TableName”: "table_name",
"ColumnNames”: ["column_name1","column_name2"]
}
This API call will give different column values for each request ,that means once a value is retrieved, it had been marked as retrieved and cannot be retrieved again
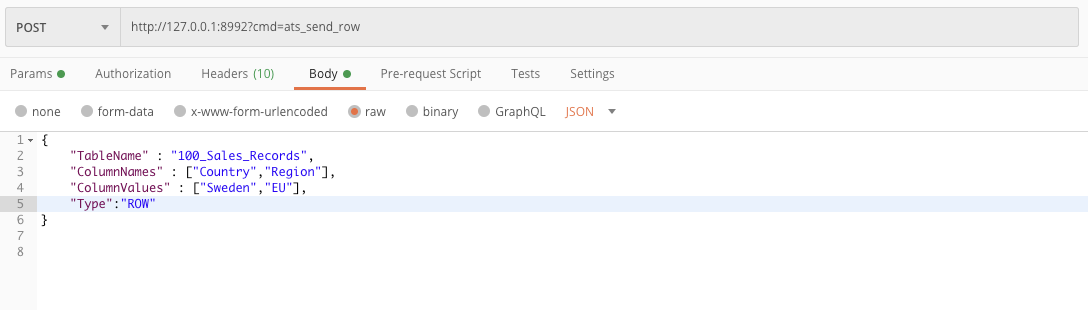
2. Set values of multiple columns in a table
POST url - http://127.0.0.1:8992?cmd=ats_send_row
body JSON - {
"TableName”: "table_name",
"ColumnNames”: ["column_name1","column_name2"],
"ColumnValues”: ["column_value1","column_value2"],
"Type”: "ROW"
}
Type have three values ROW, STACKED and UNIQUE
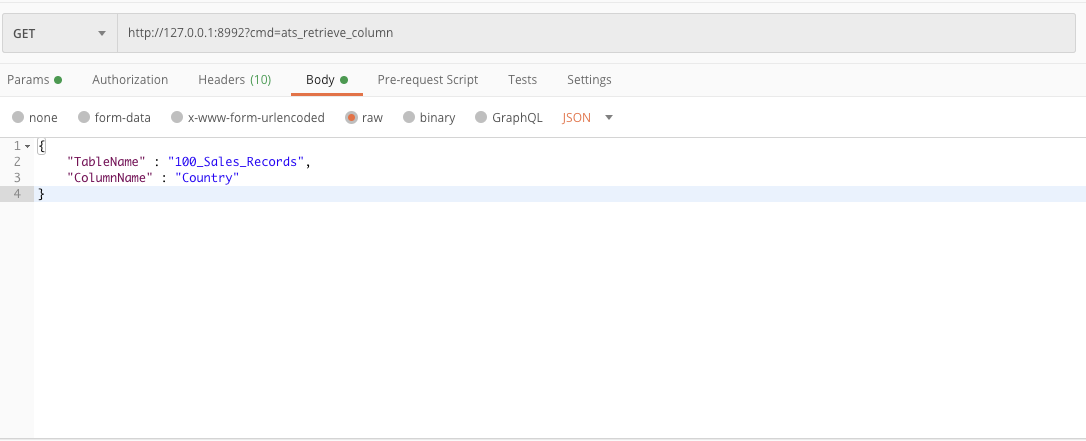
3. Retrieve a column value from a table - Suits performance testing use cases , but can be used for other use cases with the help of RowIndex
GET url - http://127.0.0.1:8992?cmd=ats_retrieve_column
body JSON- {
"TableName”: "table_name",
"ColumnName”: "column_name"
}
By default this API call will give different column values for each request ,that means once a value is retrieved, it had been marked as retrieved and cannot be retrieved again. But in some cases if you want to retrieve always the same value , you need to pass the third parameter RowIndex
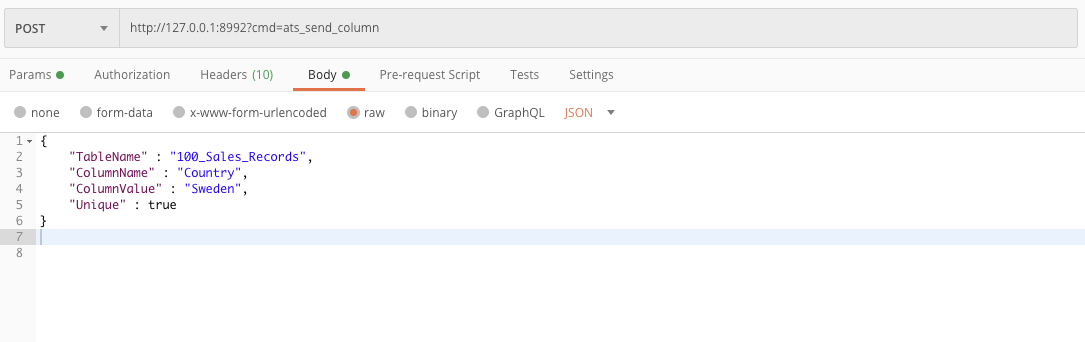
4. Set a column value in a table
POST url - http://127.0.0.1:8992?cmd=ats_send_column
body JSON- {
"TableName”: "table_name",
"ColumnName”: "column_name",
"ColumnValue”: "column_value",
"Unique”: true
}
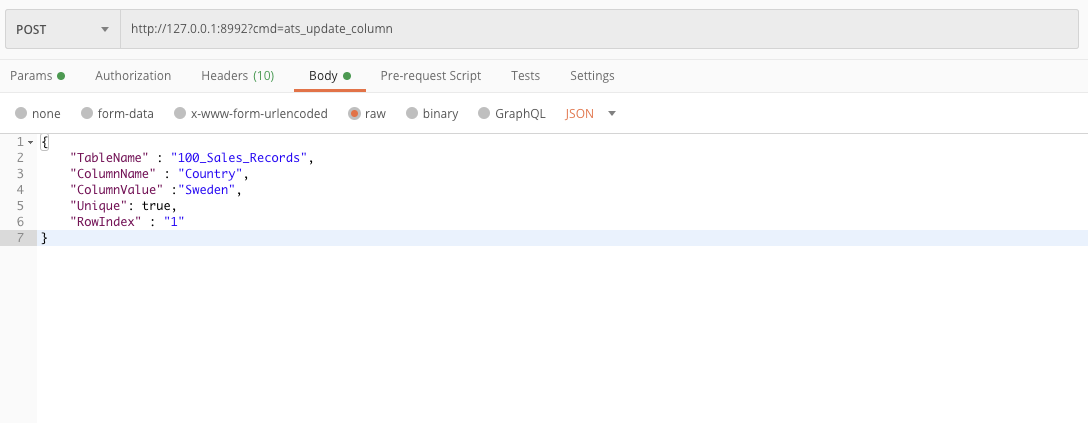
5. Update a column value by row index in a table
POST url - http://127.0.0.1:8992?cmd=ats_update_column
body JSON - {
"TableName”: "table_name",
"ColumnName”: "column_name",
"ColumnValue”: "column_value”,
“Unique”: false,
" RowIndex “: 1
}
6. Get the size of a table or column in a table
POST url - http://127.0.0.1:8992?cmd=ats_retrieve_table_size
body JSON - {
"TableName”: "table_name",
"ColumnName”: "column_name" ColumnName is optional
}
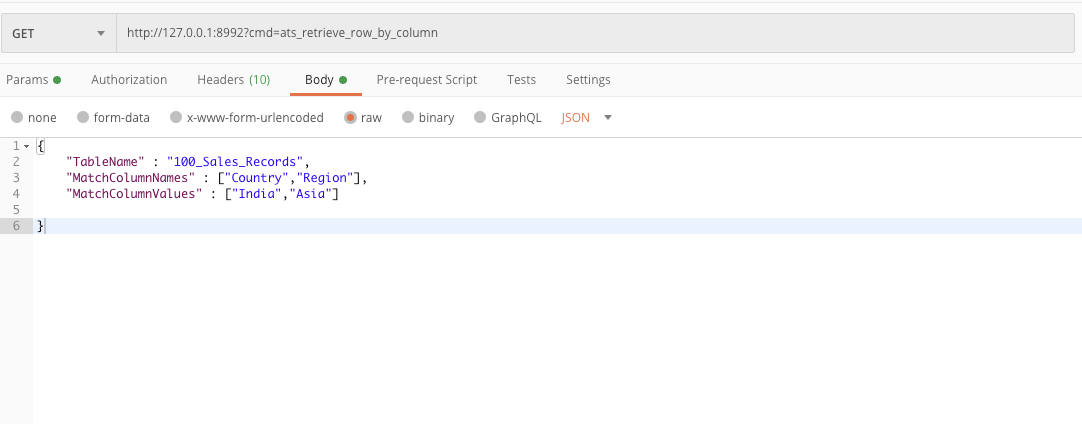
7. Retrieval of rows based on multiple column names and values. This API also supports an optional input OuputColumnNames, the column names in rows to be retrieved based on the matching column names and values
GET url - http://127.0.0.1:8992?cmd=ats_retrieve_row_by_column
body JSON- {
"TableName”: "table_name",
"MatchColumnNames": ["column_name1",”column_name2”],
"MatchColumnValues" : ["column_value1","column_value2"]
}
8. Save a table after you have called any of the above APIs
POST url - http://127.0.0.1:8992?cmd=ats_save_table
body JSON - {
"TableName”: "table_name"
}
9. Retrieve all the records in a particular table
GET url - http://127.0.0.1:8992?cmd=ats_retrieve_all_rows
body JSON - {
"TableName”: "table_name"
}